How to Install Ubuntu?(Install Inside Windows)

Many of you would have installed WINDOWS XP or WINDOWS 7 in your systems but have you ever tried to install UBUNTU or any other LINUX flavours? If you try to install UBUNTU by BOOT-TIME installation, you will come across some problems and most of you will be not in a situation to install it successfully and come up with a conclusion saying WHAT THE HELL MAN?, I TRIED TO INSTALL UBUNTU BUT ITS INSTALLATION STEPS ARE SO DIFFICULT AND IT IS HIGHLY RIDICULOUS. But actually, you are wrong. Installation is so easy and there is no need of sitting in front of computer during installation time.


How actually you can install UBUNTU?

Ans) There are 2 methods by which we can install UBUNTU.


  1. Boot-Time Installation.

  2. Install Inside Windows(Only if Windows OS is installed in your computer)


Here, i completely deal with Install Inside Windows method since it is very easy. Not saying Boot-time installation is difficult, but there has to be some work which has to be carried out by you to install. This needs prior knowledge. And there is also some problems if you install UBUNTU in Boot-Time installation method. Main problem is GRUB load error. If you have observed, the OS will be searched and loaded into memory by Boot-loader(Windows). Exactly in the same way, in UBUNTU the loader is called as GRUB. If you un-install UBUNTU directly(i.e by directly formatting your previously installed UBUNTU drive) you will face problem saying GRUB LOAD ERROR. This means, the MBR(Master Boot Record) has been corrupted or the OS was un-installed in a wrong way. And also the mounting of the drive as a "/" file system and providing a swap-space task will be not known to many people.  Thus to get rid from all these problems and install UBUNTU in more successful and easy way is Install Inside Windows.


Install Inside Windows needs Windows as a Master OS. Master OS means, the loader and the Boot Menu is directly or indirectly connected with WINDOWS. Since this is a easiest method to install UBUNTU, i prefer this type of installation. Well, the steps for the installation of UBUNTU by INSTALL INSIDE WINDOWS method goes as given below:---


  • Put your UBUNTU installation disc in you CD/DVD reader.

  • After Autoplay, a window will be popped out and 3 options will be shown to you. Select Install Inside Windows option.(Same for 9.10 and also for 10.04)


  • In a new window, select the harddisk drive and the installation size(Preferably 8GB) and also enter the password(Do not forget the Username and Password at any cost).

  • Setup copies the installation files to your drive and after copying, it asks for reboot of the system. CD will be ejected out from the DVD reader.

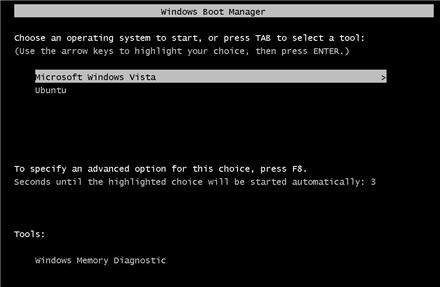
  • After restart, select the UBUNTU option.


And now you make sure that internet is switched on. Installation without internet will not install CANONICAL manager or the Canonical application installer. Thus, without fail, turn on internet during installation process.(**This process can be carried out even after complete installation).

Installation takes 20min's.  After complete installation, login with the username and password which you gave. You can configure your UBUNTU now. Configuring of UBUNTU posts is also posted in this blog.

If  you try to install something from terminal and if it says something saying. Couldn't find files, then no need to worry.  Just go to terminal and enter this. (Thanks to sudarshan).

sudo apt-get install update

You will be done with this. Everything will be completely fine.


Thank you :)

Registry Editor Disabled?

You would have come across the problem saying REGISTRY EDITOR DISABLED BY YOUR ADMINISTRATOR in windows when you typed the  command regedit in RUN. To get back your Registry Editing Window, just carry out the following simple steps and you will be able to open Registry Editing Window.

Steps:--

  1. Go to Start and then RUN or keyboard Shortcut WIN+R. Then type gpedit.msc(small letters only).

  2. A window will be opened. In User configuration filter, click on Administrative templates.

  3. Then click on System.

  4. Here, you can see "Prevent access to registry editing tools" option. Double click on that and a new window will be popped out.

  5. Select "Disabled" option and then click Apply.


End of the steps. You will be able to open Registry Editor now.

Thank you.

Task Manager Disabled in Windows?

This is more or less a usual problem everyone would have suffered with. Everyone would have heard about this problem from their friends or others. If you think there exists no solution for this problem, then you are wrong. Some of the steps which solves this ridiculous problem is given below. Carry out the following steps and you will be done with TASK MANAGER DISABLED problem.

Steps:---

  1. Go to Start and click on run or use keyboard shortcut WIN+R. Then type gpedit.msc(small letters only).

  2. A window will be opened. In User configuration filter, click on Administrative templates.

  3. Then click on System.

  4. Next select Ctrl+Alt+Del options.

  5. Then select Remove Task Manager.


A new window will be opened. In settings tab, select "Disabled" option and then click on Apply.

That's it. Now you will be able to see TASK MANAGER after pressing Ctrl+Alt+Del.

Thank you.

Working with LEX & YACC programs in Ubuntu.


You might have wondered why LEX and YACC programs will not work in LINUX even if have written your program correctly. Well, no need to worry. Just a simple 3-4 steps will successfully execute your programs.


Steps goes like this :---


  1. Go to terminal and enter the following command. sudo apt-get install build-essential

  2. Then type sudo apt-get install flex(For lex programs).

  3. Again type sudo apt-get install bison(For yacc programs).


If you carry out above process, you will be done with configuring FLEX and BISON.  Now you will be able to execute your lex and yacc programs.


Thank you :)


Installation guide Of OpenGL in Windows

Download Microsoft Visual Studio 2008 and select Visual Studio C++  during installation.

After installing, you have to install GLUT.

GLUT can be downloaded from

http://www.mediafire.com/?ij1m9em7xdy

Configuring GLUT:--

  • C:\Program Files\Microsoft Visual Studio 9.0\VC\bin---->Paste glut32.dll file

  • C:\Program Files\Microsoft Visual Studio 9.0\VC\include---->Paste glut.h file

  • C:\Program Files\Microsoft Visual Studio 9.0\VC\lib---->glut object library file glut32.lib

  • C:\Program Files\Microsoft SDKs\Windows\v6.0A\bin--->-glut32.dll

  • C:\Program Files\Microsoft SDKs\Windows\v6.0A\Include---->glut.h

  • C:\Program Files\Microsoft SDKs\Windows\v6.0A\Lib--->glut32.lib

  • C:\Program Files\Microsoft SDKs\Windows\v6.0A\Include\gl---->glut.h

  • C:\WINDOWS\system32---->glut32.dll


Debug and Run the code. If any problem or clarification regarding the installation of OpenGL or GLUT, please post it in comment panel or mail me to srikanth.gundaz@gmail.com.
Thank you. :P :)

Installation guide of OpenGL API in Ubuntu/Fedora

Many would have installed OpenGL, an API(Application Programming Interface) for writing applications that produce 2D and 3D Computer Graphics.


Installation of OpenGL in Linux platform is different and installation in WINDOWS is different. So, some set of steps has to be followed while installing OpenGL in LINUX platform.


Steps goes like this:--


First we need to install the IDE(Integrated development environment). Here, we use CODE::BLOCKS IDE.  To install, open the terminal and type the following command.


sudo apt-get install codeblocks


What actually happens when u execute this command?

The application name specified in the command will be checked in the repository and then the application gets installed by downloading the installation files from the internet or from the pre-installed folder which contains installation files.


Now, IDE is ready but we have to install GLUT(OpenGL Utility Toolkit).  We have to pay for installing GLUT but FREEGLUT available in the net. So, we can install this by the following 2 commands. Enter these following commands in the terminal.


sudo apt-get install freeglut3

sudo apt-get install freeglut3-dev


GLUT files will be installed in /usr/include/GL/   directory.


Once the API is successfully installed, next step is to configure it.

Steps:--


  • Go to Applications-->Programming-->Code::Blocks IDE

  • Then, go to Settings-->Compiler and debugger.

  • Open Linker settings tab. Then, in the bottom, you can see the ADD button. Click on Add button and then type glut and click on ok.  In the same way, type as GLU and GL in Linker settings tab.


FreeGLUT is installed now.


Now API is ready to execute the programs.


Type the program and if you come up with any problem saying cannot find lXxf86vm, then no need to worry. Just go to terminal and type the following command and you are done with that.


sudo apt-get install libXxf86vm-dev


Now, run the program and it must execute.


Any problem or clarifications regarding this post can be posted in the comment panel or email to srikanth.gundaz@gmail.com.


Thank you. :)

How to code OpenGL programs on Ubuntu?

After searching for a long time, I've finally found a solution on how to use Code::Blocks to work with OpenGL APIs.
Code::Blocks is an IDE just like Visual Studio on Windows. Install Code::blocks from the Ubuntu Repository by typing this at the terminal.

sudo apt-get install codeblocks

Once you're done, you need to download files that support OpenGL. You need to install the following package for it to work.

freeglut3 & freeglut3-dev - For GLUT Library. It installs some files into your /usr/include/GL/ folder.

libsdl1.2-dev - For SDL Library. It installs some files into your /usr/include/SDL/ folder.

To install these type the following at the terminal.

sudo apt-get install freeglut3

sudo apt-get install freeglut3-dev

sudo apt-get install libsdl1.2-dev

Once you're done with this library installation, you should tell the Code::Blocks to link to the correct library for it to be able to execute GLUT/SDL programs. This is how you do it.

1. Open Code:Blocks (You can find this in Applications -> Programming -> Code::Blocks or type codeblocks at your terminal)

2. Go to Settings -> Compiler and Debugger.

3. Open Linker Settings tab. And under "Link Libraries" add "glut" for GLUT, "SDL", "GLU" and "GL" for SDL.

4. Click OK and you're now done with it. Now your CodeBlocks should be able to compile OpenGL - GLUT/SDL code. Compile a running code to check.

If it didn't work then please comment on this post so that i can help you.

PS: The whole procedure is to install both GLUT and SDL Libraries. But it is always any one, either GLUT or SDL, that is used. So if you want to install any one of them then skip the instructions that are for the other one.

Lucid Lynx

Today, the most of the users and clients use LINUX operation systems. Nowadays, a lot and lot of LINUX flavours has been developed and released by different companies but still the development of the OS is still in progress. Even, most of the users and clients(as of now) use LINUX, still in the corner of their minds, they think that WINDOWS is better than LINUX. This feel comes to mind only when he/she fails to use a software in the LINUX or feel difficulty in using the command lines or the user interfacing criteria's. This is the foremost feel/think which the user gets when he/she suffers or find difficult in using LINUX. So, the development/upgradation of the LINUX OS's is more essential to make sure that none of the user finds difficult in using LINUX. Same thing is being done by a famous LINUX OS developing company named UBUNTU.


Currently, this company has a UBUNTU 9.10(Karmic Koala) as its current stable version of LINUX. And the upcoming version named UBUNTU 10.04(Lucid Lynx) has a greater development/enhancement of the OS.


Change in the features of LUCID LYNX:--


  • Schedule for release on 29 April 2010.

  • We have a Gnome version-2 as the default environment for Ubuntu 9.10, we still have Gnome2.x only as the default environment in LUCID LYNX too.

  • Gnome 3 will be developed for a stable use and will be released as a Long Term Support version(LTS) or in the next version of Ubuntu. But as of now, Ubuntu 10.04 has sticked with Gnome2.x as its Long Term Support version since the Gnome 3 is under development and testing.

  • Working on the enhanced version of GTK+ that will include RGBA support.(A=Alpha , meaning Transparency). This means, there might be inclusion of Transparency or a high quality desktop viewing as that of WINDOWS 7. Right now, an application named ADVANCED DESKTOP EFFECTS is used as a tool for improvement in the effects of the desktop but we didn't have a transparency effect in that. May be GTK+ includes transparency effect.(Have to wait and explore after its stable release).

  • Installation time will be reduced since downloads and installation will happen in parallels and hence a great shorting of the installation time. In Ubuntu 9.10, first the download of installation files will happen and then the installation will be carried out. So, apparently, the time needed for the installation by LUCID LYNX is pretty much lesser than that of earlier versions.

  • PIDGIN(IM[Internet Messenger] client)  may be removed from 10.04 and they might upgrade and setup the EMPATHY as the default IM client.

  • The most worrying part in 10.04 is, it might not contain GIMP(Same as that of ADOBE PHOTOSHOP). This is a major loss to Ubuntu users. I really dont know why, Ubuntu developers are going to take out GIMP.


Well, these are some features which will be included in UBUNTU 10.04 LUCID LYNX. Till the stable version is released, all the things should be considered as tentative.
Comments are whole-heartedly welcomed.   Thank you :)

Blogger in Draft

http://draft.blogger.com

I'm not sure how many of you know about this. I've been using it from quite sometime now.

Blogger in draft not so different from Blogger but with added functionalities. People behind blogger add new features to blogger in draft before releasing them to rest of the world. It has a better editor with some great features. All that you need to do is to log in to draft.blogger.com instead of using blogger.com and you can switch between them anytime.

You can find more FAQs here on their blog.

Using third-party templates has always been an headache in blogger, but not anymore. Use Blogger in Draft's new feature to design your own template, released just today. The best part is, it is highly customizable. You can choose between 4 of the templates (as of now), and you can customize it with hundreds of cool backgrounds and a variety of layout designs in adjustable size. You can change just about everything.

There are some more features that you may like in Blogger in Drafts. The WYSIWYG editor is more powerful and handling pictures and videos is very simple.

Snapshot below can help you find the template design feature.


"Template designer", new option under Layout Tab

Here are a couple of snapshots of what they offer at their template designer.


Basic Screen of Blogger Template Designer(click to expand)


click to enlarge

This is the secret behind my new theme ;). Kewl ain't it?

Inverse Graphing Calculator

This is something I found just now.

The above link takes you to Xamuel's latest Inverse Graphing Calculator. It gives you the equation to your desired text. It gives equation which when plotted on a graph will give you the text you entered. Click on the link above. I did not try to prove its genuineness. Try if you want but don't forget to post back your comments here later.

Here is a snapshot of it.