

Check out http://developer.apple.com/iphone/program/apply.html
to know more about the differences between the Standard and Enterprise
programs.
Deploying iPhone Apps to Real devices :-
In order to test your iPhone applications on your device, you need
to obtain an iPhone Development Certificate from the iPhone Developer Program
Portal. This needs to be done once for
every device you wish to test your apps on.
1.
Obtaining the identifier of your iPhone/iPod
touch:-
First, obtain the 40-character identifier that uniquely identitfies
your iPhone/iPod Touch. To do so, connect your device to your Mac and start
Xcode. Select the Window > Organizer menu item to launch the Organizer
application.

2.
Generating a Certificate Signing Request :-
Before you can request a development certificate from Apple, you
need to generate a Certificate Signing
Request. This step must be performed once for every device you wish to test on. To generate the
request, you can use the Keychain Access
application located in the Applications/Utilities/ folder
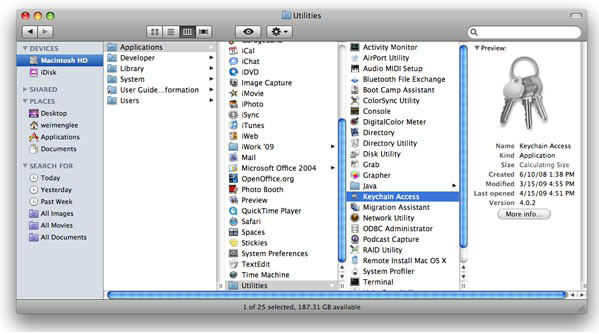
In the Keychain Access application, select the Keychain Access >
Certificate Assistant menu and select Request
a Certificate From a Certificate Authority

In the Certificate Assistant window , enter your email address,
check the Saved to disk radio
button and check the Let me specify key
pair information checkbox. Click Continue.

Choose a key size of 2048 bits
and use the RSA algorithm.
Click Continue.

You will be asked to
save the request to a file. Use the default name suggested and click Save

3.
Logging in to the iPhone Developer Program
Portal :-
Once you have generated the certificate signing request, you need to
login to Apple's iPhone Dev Center. Click on the iPhone Developer Program
Portal link on the right of the page.

In the iPhone
Developer Program Portal page, click the Launch Assistant button to walk you through the process of provisioning your iPhone and
generating the development certificate.

You should see the
welcome page as shown. Click Continue.

First, you will be
asked to create an App ID. An
App ID is a series of characters used to uniquely
identify an application (or applications) on your iPhone. You only need to
create an App ID once per application, i.e. you do
not need a new App ID for new versions of your app.
Enter a friendly name to describe this App ID (to be generated by Apple). Click
Continue.

The next screen allows
you to provide a description of your iPhone/iPod Touch. You need to provide the device ID that you have obtained earlier. Click
Continue.

You are now ready to
submit the certificate signing request to Apple. The instructions on the screen show you the steps that you have performed earlier.
Click Continue.

In this screen, click
the Choose File button to select the certificate signing request file that you have created earlier. Once the file has been selected,
click Continue.

Provide a description
for your provisioning profile. A Provisioning profile will be generated so that you can download it at a later stage and install it
on your device. Click Generate.

A Provisioning
profile will now be generated. Once it is generated, click Continue.

You are now ready to
download the generated Provisioning profile onto your Mac. Click Continue.

Drag and drop the
downloaded Provisioning profile (in the Downloads folder) onto Xcode (located in the Dock). This will install the Provisioning
profile onto your connected iPhone/iPod
Touch. Click Continue.

You can verify that
the Provisioning profile is installed correctly on your device by going to the Organizer application and viewing the Provisioning
section to see if the profile has been added.

Back in the iPhone
Developer Program Portal, you are now ready to download and install the development certificate onto your iPhone/iPod Touch.
Click the Download Now button to download the
development certificate to your Mac. Click Continue.

In the Downloads
folder of your Mac, double-click on the developer_identify.cer file that you have just downloaded to install it into a keychain on your Mac. When prompted, click OK.

Back in the iPhone
Developer Program Portal, you can now verify that the certificate has been installed properly in the Keychain Access application.
Click Continue.

In the Keychain Access
application, select the login keychain and look for the certificate named "iPhone Developer:". If you can see it there,
your certificate is installed correctly.

You are now almost
ready to deploy your iPhone application onto your iPhone/iPod Touch. Click Continue.

Click Done to dismiss
the dialog.

In Xcode, under the
Active SDK item (if this item is not already on the toolbar, go to View > Customize Toolbar and add it to the toolbar), select the OS
version number of the device that is currently
connected to your Mac.

With your
application project open in Xcode, press Command-R to run the application. You will now be prompted for permission to access the certificate
saved in your keychain. Click Allow (or Always
Allow) to go ahead with the signing.

Your application will
now be deployed to the device. You can see its progress in the Summary tab of the Organizer application.

Once the application
is deployed onto your device, it will be running automatically. You can capture screenshots of your device by going to the Screenshot
tab of the Organizer application, and pressing the
capture button.

The iPhone Developer program allows you to provision up to 100
devices for testing purposes. Once a device is provisioned, you can then use
the development certificate to deploy your applications onto it.
Thanks for reading this article. Hope this has helped you. Stay tuned at Techspace.
Thanks for reading this article. Hope this has helped you. Stay tuned at Techspace.


