Make international and local calls for free from PC to Phone

As you all know that there are lot of companies which helps us to communicate to our friends, relatives and etc.. through your mobile phones and for each call, you have to pay some amount as per the tariffs of the company. And for free call, you need to recharge for some amount weekly or monthly which is too dependent on the company's tariffs.  But here is one fabulous way to make calls through internet for free.  If you think this is a call like voice calls or video calls which we do from gmail or skype then you are totally wrong. This is a call from your PC to any mobile :) :) And that too for free and without any paid registrations nor weekly/monthly pay :) :)


Well, what is this about and how can you do the calls?


Very simple :) :)


  1. Just open the site http://evaphone.com/

  2. Choose the country of the recipient from the drop-down list.

  3. Enter the number.

  4. Call and start talking


But one problem with this is that you can enjoy the talk only for a short time and Call duration and number of times allowed to call the same number depends upon the country and service provider.  After you enter phone number and click on call, then an advertisement will be popped out and it will be shown for some 10-15seconds :) :)  Right after advertisement, your call will be connected to the called number and you can enjoy your talk :) :) :)


You can also register in this site for free and you can call to any number :) :)  Free registration :) :)  And if you want to call for many people/numbers, then you can recharge your calling internet account in this site by paying some money and then you can call and enjoy your talk :) :)


Well, this is the end of the post :) Any further updates regarding this topic is whole-heartedly welcomed :) :) Please post your comments in comment panel :) :)


Thank you :) :) :)

How to download protected books from Scribd?

Scribd as we all know is like youtube for books. Unlike YouTube, Scribd allows you to download documents. But there are times when you come across some documents that are protected by the author. Meaning - you cannot download them.
But I've found a simple trick by which you can download any protected document on Scribd in a pdf format. As I said, it is a simple trick which exploits the 'Print Document' facility available on Scribd. Here's how we do it.

Step 1: You need a simple piece of software that acts as a PDF printer. A PDF printer is not really a hardware printer but indeed a software one. When you print the document using this printer, the printer prints the document into a pdf file which can be stored on your computer. CutePDF Writer is one such software which does your job. You can download it from here. Download and Install it. Some alternates are : PrimoPDF, PDF Creator,  doPDF.

Step 2: Now the job is very simple. You open a document on scribd. If you see the document is protected then right click on the document and select "Print Document". It asks for the page range. Click Print again and Print dialog will open. Select the new PDF printer you just installed. Click Print.

The whole document will now be printed into a pdf file. When it is done it prompts you to give a name to the pdf file. And you're done.

You've successfully downloaded a Protected scribd document.

Comment your queries.

PS1: If a document is protected by author of the document then it is for some genuine purpose.

PS2: "If you can see it on your screen, it can be yours."

Firefox 4 beta 1 in Ubuntu


Once upon a time, there was something called Microsoft Internet Explorer…
Then came Mozilla Firefox… IE is now almost forgotten.
But then came Google Chrome. But is firefox going to be forgotten? No way! There’s more to come.
Chrome is already in version 5 and its growing lightning quick. They’re already working on version 6 and it will be out soon. Mozilla outbroke the browser market once ruled by IE. But then with the introduction of Google Chrome, it faced some serious competition and is now struggling hard to top the list. Now Mozilla is coming up with version 4. Firefox 4 is now in beta version and you can try the beta version here.
Firefox 4 has slimmed down and acquired chrome-like look by shifting tabs to the title bar. It also embodies a better Add-on and extension manager. Significant improvements seen in handling Javascripts. Supports HTML5 and many more.
Here’s how you can Install Firefox4 on Ubuntu 10.04.
Step 1 : Go to http://www.mozilla.com/en-US/firefox/beta/ and download the Firefox 4 tar ball. The package will be downloaded to your Downloads Folder.
Step 2: Type the following in Terminal
sudarshan@mycomputer:~/Downloads$ bzip2 -d firefox-4.0b1.tar.bz2
sudarshan@mycomputer:~/Downloads$ tar xvf firefox-4.0b1.tar
firefox/
firefox/mozilla-xremote-client
firefox/platform.ini
firefox/README.txt
firefox/libsoftokn3.chk
firefox/libnssckbi.so
...
sudarshan@mycomputer:~/Downloads$ sudo mv firefox /opt/
sudarshan@mycomputer:~/Downloads$ ln -s /opt/firefox/firefox ~/bin/firefox4
sudarshan@mycomputer:~/Downloads$ firefox4

That should do. :)

Kaspersky Trial license for ever.

There exists many anti-viruses but we have to choose wisely the one which is good and correctly heals the viruses and protect your system from malwares, adwares and viruses. I say KASPERSKY is the best anti-virus. No other anti-virus can beat this but the main problem in this is the license. After a fresh installation, if you have internet, then you can get trial license key which is valid only for 30days from kaspersky server, but after 30days, you have to install a new key. If the key is original, then well and good, if not, then you have to buy key from kaspersky. This,  many of us don't do. So let we think of free trial which we can get from kaspersky even after first 30days validity. How can we do this and how long will that license persists is discussed below.


First and foremost you have to install kaspersky. haha!! lol!!!  Then activate trial license(fresh installation).  Then use kaspersky without any interventions for 30days. Then your license validity completes.  What to do now?  Nothing much.  Just by carrying out 10steps which are specified below and you can have a valid kaspersky with all security for your system for ever.


Steps goes as given below:-


  1. Disable Kaspersky Self-Defense. Open Kaspersky, go to Settings > Options> Disable the item "Enable Self-Defense"> OK.

  2. Run KasperskyRestartTrial.reg. [ Download this file from  http://www.mediafire.com/file/x6r9syhf2d47j9f/KasperskyRestartTrial.rar ]

  3. Using right mouse button, click on Kaspersky icon near the clock and select Exit.


  4. Go to Kaspersky data folder. To go direct, copy the address in red below. On Windows, click on Start button and run the address below.

    %ALLUSERSPROFILE%\Application Data\Kaspersky Lab

  5. Go to AVP7 or AVP8 or AVP9 folder and rename the Data folder to any other name. For example 2Data.

  6. Open the Kaspersky.

  7. If Kaspersky rebuild the Data folder, then delete the new Data folder it recreated.   [ Be careful not to delete the original folder from step number 5, because we need it! ]

  8. Rename back the original Data folder to its original name.

  9. Select "Enable test version (30 days)"

  10. Enable Kaspersky Self-Defense! [ Settings > Options>Enable Self-Defense ] and then click on OK.


There is another way to do this. This is shown in the video. You can use this also. http://www.youtube.com/watch?v=otZeujtTWw4

That's it. Enjoy with your kaspersky and protect your computer.  Be safe, stay safe :) :) :)


Post your comments in comments panel please. You can also post/forward your problems to my mail-id  " srikanth.gundaz@gmail.com "


Thank you :) :)

Folder Option Not available in Windows XP?

Oh!!! god.  Sheesh. What happened to this?? Where the hell did the folder options go?  I have lot of hidden documents and files and without folder options i am not able to access them. God,  save me.  I am very much in need of those hidden files. Lot of work has to be done.  Plz god plz.

What are you reading? Hmmm... Exactly.  This was your condition/situation when the folder options was disabled or it was missing.  Not to worry so much. There is a easy way to enable this option. Here we go!!!

First and foremost, you need to have registry enabled in your system. In many of the systems, this would have got disabled because of viruses. If this this the case, then you can enable registry editor by reading my previous post. http://srikanthgundaz.wordpress.com/2010/04/13/registry-editor-disabled/

Now lets start with actual process of enabling folder options.

  • Click on Start-->run.    Then type as regedit and then press enter.

  • Now go to HKEY_CURRENT_USER\Software\Microsoft\Windows\Current Version\Policies\Explorer


In right-side pane, check whether a DWORD value named NoFolderOptions exists or not?  If it exists, delete it.

Now you will be able to see folder options and you can browse to your hidden folder(s) and access your documents and files.

Thank you :)

How to reset your Windows password using Ubuntu

Cracking the SAM file To reset your Windows password is very easy. What you need is bootable Ubuntu system (ie. USB, CD or anything) and software called chntpw.


Steps to do so :--


  • Shutdown your computer and boot up using your bootable system. So you run Ubuntu on Live Session that means you run your system without install it.

  • Set your repository.   Goto System->Administration->Synaptic Package Manager -> Settings -> Repositories -> Ubuntu Software and check the “Software restricted by copyright or legal issues” checkbox. And don’t forget to reload synaptic.

  • Install CHNTPW.    sudo apt-get install chntpw

  • Mount your “Windows installed” device.  It’s depending on your system, example.


sudo mkdir /media/WINDOWS


sudo mount /dev/sda1 /media/WINDOWS


  • Goto your Windows system configuration folder


cd /media/WINDOWS/WINDOWS/system32/config/


  • Cracking the SAM file


      chntpw SAM
And if you see the output similar with image below, it’s mean you 

can crack the SAM file.
As you see, there is 5 choices. Just type “1″ and press “ENTER” to 

reset your password.
That's it :)
Thank you :)


Sculptris 1.0

OMG! I love this!


Sculptris 1.0 is something you need to witness than read it here. Here is a simple trailer and a simple introduction to it.


Sculptris 1.0 is a super cool software developed by a Tomas Pettersson in a span of 6 months. It is incredibly cool and may save your worthy time. This is free. And of course you ll not mind donating some money for it. It is a 3d modeling software. I don't want to compare it with Blender or something of that type, but this is definitely great! You get to do simple stuff the simple way rather than what it is with Blender which is simple or difficult stuff it is always the difficult way.


And it is incredibly portable. Download it from sculptris.com the 3mb zip package. Yup, its all about it. No installation nothing. Extract files to a comfortable folder and just run the application. You're done and ready to make incredibly cool 3D designs. Just check out his forum for more brushes and cool stuff. :)


Here's the link to Sculptris website - www.sculptris.com

Permanently Mount Harddisk Drives in Ubuntu.

You might have suffered from a problem of re-mounting harddrive volumes/drives after each and every restart.  Its very easy to get rid from this problem of re-mounting.

Here are some steps:---

  1. Install NTFS configuration tool by typing the following command.                    sudo apt-get install ntfs-config.

  2. Go to Sytem-->Administration-->NTFS Configuration Tool

  3. Check mark(√) all the drives in the new window which popped by clicking on Auto Configure button.

  4. Now again Check Mark "Enable write support for external device" and "Enable write support for internal device" and then click on CLOSE.


That's it. From now on, there is no need of mounting the harddrive volumes after each restart. Plz do comment in comment panel.

Thank you :)

How to Install Ubuntu?(Install Inside Windows)

Many of you would have installed WINDOWS XP or WINDOWS 7 in your systems but have you ever tried to install UBUNTU or any other LINUX flavours? If you try to install UBUNTU by BOOT-TIME installation, you will come across some problems and most of you will be not in a situation to install it successfully and come up with a conclusion saying WHAT THE HELL MAN?, I TRIED TO INSTALL UBUNTU BUT ITS INSTALLATION STEPS ARE SO DIFFICULT AND IT IS HIGHLY RIDICULOUS. But actually, you are wrong. Installation is so easy and there is no need of sitting in front of computer during installation time.


How actually you can install UBUNTU?

Ans) There are 2 methods by which we can install UBUNTU.


  1. Boot-Time Installation.

  2. Install Inside Windows(Only if Windows OS is installed in your computer)


Here, i completely deal with Install Inside Windows method since it is very easy. Not saying Boot-time installation is difficult, but there has to be some work which has to be carried out by you to install. This needs prior knowledge. And there is also some problems if you install UBUNTU in Boot-Time installation method. Main problem is GRUB load error. If you have observed, the OS will be searched and loaded into memory by Boot-loader(Windows). Exactly in the same way, in UBUNTU the loader is called as GRUB. If you un-install UBUNTU directly(i.e by directly formatting your previously installed UBUNTU drive) you will face problem saying GRUB LOAD ERROR. This means, the MBR(Master Boot Record) has been corrupted or the OS was un-installed in a wrong way. And also the mounting of the drive as a "/" file system and providing a swap-space task will be not known to many people.  Thus to get rid from all these problems and install UBUNTU in more successful and easy way is Install Inside Windows.


Install Inside Windows needs Windows as a Master OS. Master OS means, the loader and the Boot Menu is directly or indirectly connected with WINDOWS. Since this is a easiest method to install UBUNTU, i prefer this type of installation. Well, the steps for the installation of UBUNTU by INSTALL INSIDE WINDOWS method goes as given below:---


  • Put your UBUNTU installation disc in you CD/DVD reader.

  • After Autoplay, a window will be popped out and 3 options will be shown to you. Select Install Inside Windows option.(Same for 9.10 and also for 10.04)


  • In a new window, select the harddisk drive and the installation size(Preferably 8GB) and also enter the password(Do not forget the Username and Password at any cost).

  • Setup copies the installation files to your drive and after copying, it asks for reboot of the system. CD will be ejected out from the DVD reader.

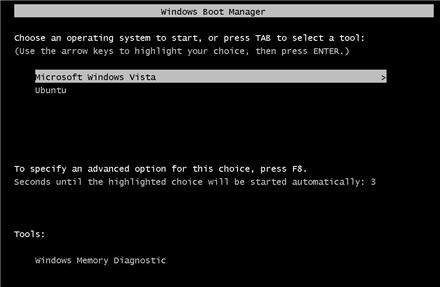
  • After restart, select the UBUNTU option.


And now you make sure that internet is switched on. Installation without internet will not install CANONICAL manager or the Canonical application installer. Thus, without fail, turn on internet during installation process.(**This process can be carried out even after complete installation).

Installation takes 20min's.  After complete installation, login with the username and password which you gave. You can configure your UBUNTU now. Configuring of UBUNTU posts is also posted in this blog.

If  you try to install something from terminal and if it says something saying. Couldn't find files, then no need to worry.  Just go to terminal and enter this. (Thanks to sudarshan).

sudo apt-get install update

You will be done with this. Everything will be completely fine.


Thank you :)

Registry Editor Disabled?

You would have come across the problem saying REGISTRY EDITOR DISABLED BY YOUR ADMINISTRATOR in windows when you typed the  command regedit in RUN. To get back your Registry Editing Window, just carry out the following simple steps and you will be able to open Registry Editing Window.

Steps:--

  1. Go to Start and then RUN or keyboard Shortcut WIN+R. Then type gpedit.msc(small letters only).

  2. A window will be opened. In User configuration filter, click on Administrative templates.

  3. Then click on System.

  4. Here, you can see "Prevent access to registry editing tools" option. Double click on that and a new window will be popped out.

  5. Select "Disabled" option and then click Apply.


End of the steps. You will be able to open Registry Editor now.

Thank you.